
In our previous post Robocopy in e-Discovery, we wrote about copying electronic evidence using Robocopy and preserving file system metadata. Robocopy is a great tool for copying files, but it does not offer an option to hash the source and destination files. While this may not be necessary for casual personal use, being able to confirm that the output files are identical to the source files using cryptographic hashes is crucial when working with electronic evidence.
There are commercial off-the-shelf file copy tools which have this functionality built-in, but they usually lack the flexibility that Robocopy offers. If you are a Robocopy fan, and do not mind a little bit of command line work, follow along and we will show you how to validate Robocopy results using the freely available software package md5deep.
What is md5deep?
md5deep is a command line application in the public domain. It can be used to calculate cryptographic hashes (MD5, SHA-1, SHA-256, Tiger192 and Whirlpool) of files. It can walk through directories recursively and calculate the hashes of each encountered file or work off of a text-based file listing. We chose to use md5deep for this post because it is fast, robust and free.
Required Tools
- md5deep – Available for free at http://md5deep.sourceforge.net
- Your text editor of choice (e.g. UltraEdit, TextPad etc.)
When you download md5deep, remember to either copy md5deep.exe to your Windows\System32 folder or add its path to your path system variable so that it can be accessed from anywhere.
This post assumes that:
- You have copied a set of files using Robocopy as outlined in this post
- The copy operation completed successfully without any errors
- Your source and destination folder paths were as follows:
Source: D:\MySourceFiles\
Destination: E:\MyDestination\
Step 1: Calculate the Hashes of The Source Files
We will use md5deep to calculate the hashes of all files in our input folder (“D:\MySourceFiles\”). md5deep outputs the calculated MD5 Hash values to the console. In order to save the output, we will redirect it to a text file using the “>” symbol. The steps are as follows:
- As always, make sure that your source is write-protected before accessing it
- Open a command prompt at your source folder “D:\MySourceFiles”
- Issue the following command:
md5deep -rel * > “C:\Temp\InputHashes.md5”
The -rel switch instructs md5deep to enable recursive mode, display a progress indicator and use relative file paths.
This will create a list of MD5 hashes for each file contained in your source folder. The list should look as in the example below:
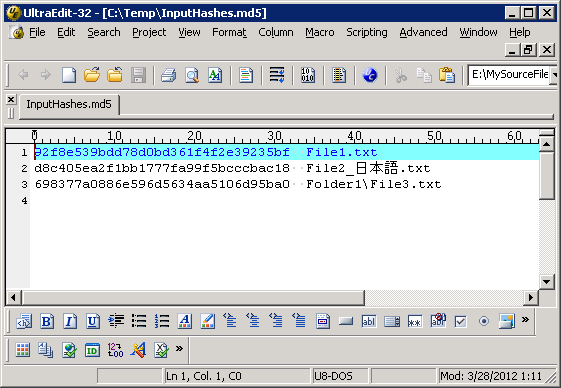
Figure 1 – Input Files MD5 Hashes from md5deep
Note that the resultant file “InputHashes.md5” is a UTF-8 encoded text file and non-English characters in the file names were preserved.
Step 2: Calculate the Hashes of The Output Files
Similarly, we can calculate the MD5 hashes of the output files using md5deep as follows:
- Open a command prompt at your destination folder “E:\MyDestination”
- Issue the following command:
md5deep -rel * > “C:\Temp\OutputHashes.md5”
Step 3: Compare The Hash Lists
At this point, you should have two hash lists: “InputHashes.md5”, which contains a list of MD5 hashes for the source files, and “OutputHashes.md5”, which contains a list of MD5 hashes for the output files. Since we chose the relative file path option while using md5deep, both hash lists should contain the same folder paths. Consequently, if all files were copied correctly, both hash lists should be identical.
We can easily check whether or not this is the case by hashing the hash lists and comparing them. We will use the following commands:
md5deep “C:\Temp\OutputHashes.md5” >> “C:\Temp\Comparison.txt”
Contents of “Comparison.txt” should be as follows:
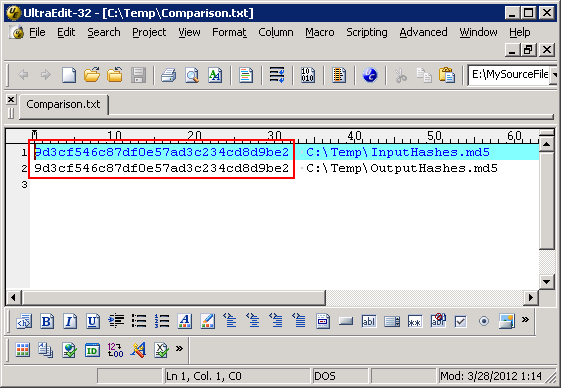
Figure 2 – md5deep Hash Comparison
If both hash values are identical, we can conclude that each output file has the same MD5 hash value as the corresponding source file. If you would like to confirm that the process is working correctly, you can edit “OutputHashes.md5” and change one of the MD5 hashes. When you re-run Step 3, the MD5 hash of the output hash list should be different than that of the input hash list.
What If The Hashes Do Not Match?
In the event that the two hash lists turn out to be different, you may want to determine which files have different hash values. A quick and easy way to accomplish this is to use a file comparison tool such as WinMerge (open source) or UltraCompare (commercial). These tools allow two files to be opened side by side (“InputHashes.md5” and “OutputHashes.md5” in this case) and highlight the differences.
Couldn’t We Have Used The Negative Matching Mode In md5deep?
md5deep has an option that enables negative matching mode. In this mode, the program takes a list of known hashes and identifies files that are outside of that list. For example, opening a command prompt at your destination folder “E:\MyDestination” and issuing the following command would create a list of all files in your destination folder that have hashes outside of the input hash list:
This looks like a very efficient way to determine which files were not copied correctly. However, if we had used this method, we would have missed two scenarios:
- Files completely missing from the destination
- Files that do not match their source file by MD5 hash, but match another file in the source data set
The second scenario may sound far-fetched, but consider the following example: The input folder contains a number of 0-byte files. If a file, which was not originally a 0-byte file, does not get copied correctly and becomes a 0-byte file in the destination, it would not be identified using the negative matching method because its hash matches that of other files in the source data set.